

The procedure with illustrations!
Parallel parking, which many people are not good at operating a car. Is there an easy way for anyone to do it? In this article, I will explain how to parallel park with illustrations in 5 steps. We will also introduce the points where parallel parking fails and the improvement measures.
How to parallel park and how to get out
First, the parallel parking procedure is divided into five steps and explained in an easy-to-understand manner with illustrations. In addition, we will also introduce the points when leaving a similar parking space.
Five steps for parallel parking [with illustrations]
No unique technique is required for parallel parking. If you operate correctly according to the procedure, even those who are not good at it will be able to do it. Let’s take a look at each of the five steps. In addition, the parallel parking introduced here is assumed to be parked on the left side of the road.
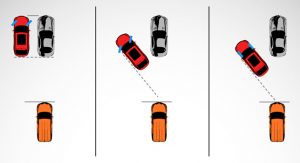
Step 1 | Park next to the car in front of you
The first step in parallel parking is to park parallel to the side of the car in front of the parking space. At this time, keep the distance from the car next to you to about 50 to 100 cm and stop. When it is plugged in parallel, slowly back up and stop by aligning the rear position of the car body with the sidecar.
In addition, to parallel park comfortably, the vertical length of the parking space must be at least 1.5 times that of a car. If it’s about the same length as your car, don’t try to parallel park and look for another parking spot.
Point of step 1
Park at a distance of 50 to 100 cm from the sidecar
Align the rear position of the car body with the sidecar
Check if the vertical width of the parallel parking space is about 1.5 times that of the car
Step 2 | Turn the handle to the left and back
Point of step 2
Turn the steering wheel to the left while stopped
Stop when the entire front part of the car behind is reflected in the right side mirror.
Step 3 | Straighten the tires and back.
In step 3, turn the handle to the right and straighten the tires, aiming to enter the parking space at the proper angle. When returning the tires, operate the steering wheel while the vehicle is stopped, as in step 2. Generally, when the tire is turned to the left, the direction of the tire will return straight by doing two laps to the right. When the tires turn back, the next step is back. Stop when the right rear wheel hits the line on the right side of the parking space.
Point of step 3
When stopped, turn the steering wheel to the right and straighten the tires.
Back to the point where the right rear wheel hits the line on the right side of the parking space and stop
Step 4 | Turn the steering wheel to the right and back
In step 4, turn the steering wheel to the right from the position you stopped in step 3, slowly back up, and ultimately bring the car into the space. Stop when the entire vehicle fills the parking space.
Be careful not to hit your vehicle’s front left and rear left against the car or obstacles when backing up. The left front part often comes into contact with the right-rear part of the car in front when backing up, and the left rear part often comes into contact with curbs or guardrails.
Point of step 4
Turn the steering wheel to the right while the vehicle is stopped.
Slowly back while paying attention to the left front and left rear
Stop when the entire car enters the parking space
Step 5 | Adjust the sense of distance to the front and rear cars.
The last thing to do in step 5 is to fine-tune the distance to the front and rear cars. In step 4, turn the handle to the left and turn the tire straight back from the stop position. Then, when the front and rear cars leave, or when your car leaves, move forward or backward to adjust the front and rear space so that you can safely go. Balance the distance without packing too much in the front or back.
Point of step 5
When stopped, turn the steering wheel to the left and straighten the tires.
Balance the distance to the front and rear cars
Precautions on how to get out after parallel parking
When you leave the parking space after parallel parking, check the distance so that you do not come into contact with the cars in front of you before you start. The common problem is that you start when you are close to the vehicle in front of you, and the left front of your car comes into contact with the right rear of the car in front of you.
You can avoid contact by turning the steering wheel to the right before starting and then slowly moving forward while being aware of the front left part of your vehicle. If you are close to the car in front of you and you are likely to come into contact with it, back it up and return it to its original position. Then, turn the steering wheel to the left, turn the tires straight around, about a little, take a distance from the car in front, and perform the operation when starting again.
Generally, if you can see the entire rear bumper of the car in front of you when you start, you are at a sufficient distance. However, depending on the type of car, the length may not be enough, so be sure to remember the remarkable space and how it looks from the driver’s seat at that time.
Four tips for parallel parking
In addition to the parallel parking procedure, it’s a good idea to remember some tips for not failing. Here, we will introduce four points of driving operation to prevent failure and examples of failure.
(1) Sufficiently adjust the width at the start
The key to not failing to parallel park is to get close enough to the car parked in front of the parking space. If the width is too loose, the car body will be too angled concerning the parking space when backing up, or the timing of entering the parking space will be delayed, and parking will fail.
If you have enough width at the beginning, you can get into the parking space early so that you can fit the rear part firmly in the parking space. Also, the angle is not so great, so it is easy to adjust the car’s direction.
(2) Turn the steering wheel left and right at the right time
The trick to parallel parking is to turn the steering wheel in the right direction at the right time. In parallel parking, the steering wheel is mainly turned four times as follows.
(1) Turn the steering wheel to the left at the starting point
(2) Turn the steering wheel to the right when the entire rear car is reflected in the right side mirror
(3) Handle when the right rear wheel hits the parking spaceline. Turn to the right
(4) Turn the steering wheel to the left when the entire car enters the parking space
As a typical failure example, if the timing to turn the steering wheel in (2) is too early and there is no angle to enter the parking space. The vehicle body does not enter, or if the steering wheel’s timing in (3) is too late, the left side of the parking space. For example, you may encounter an obstacle in the car or a car behind you. As long as you hold down the timing to turn the steering wheel, you do not need to operate the steering wheel.
(3) Grasp the outer ring difference
It is also essential to know the exterior ring difference so that parallel parking does not fail. If you do not see the difference between the outer wheels, the left front part may contact the right-rear part of the car in front when you turn the handle to the right and back to fit the car body in the parking space.
The outer ring difference represents the difference in track width between the outer front wheels and the rear wheels when turning left and right. When backing up, turning the steering wheel to the left causes the front right wheel to bulge, and turning the steering wheel to the right reasons the front left wheel to bulge outward from the track of the rear wheels.
(4) Utilize the assist function
People who are not good at parallel parking can reduce the risk of failure by using the car parking assist function . The following is an example of a parking assist function that is useful for parallel parking. The name and ability of the assist function differ depending on the manufacturer and model.
Also read: how to grout tile


